
How to make Multiple French Darts
 1. Trace the bodice-front sloper. Cut out the tracing and the dart. 2. Draw the line for the French dart (Fig. 51a). This is a guideline for positioning the new darts. 3. Locate the position of the new darts 1/2 inch away on each side of the guideline. End the lines 1/2 inch from the dart point. This automatically shortens the darts while in construction instead of shortening them in the final pattern. Mark the ends with a cross line (Fig. 51a). 4. Connect the ends of the new darts with the dart point (Fig.51a). 5. For clarity in developing the pattern, label sections 1, 2, and 3 as in the illustration (Fig. 51a). 6. Cut away section 2 from the rest of the bodice. 7. Close the waistline dart and fasten it with Scotch tape. This throws the dart control to the new position. S. Place section 2 in the new dart opening so the spaces between 1 and 2 and 3 and 2 are equal (Fig. 51b). Trace the pattern. 9. Locate the new dart points in the center of each spread area at the shortened length. Draw new dart legs, making certain that each pair is equal in length. (Fig. 51b ). 10. Fold the darts into position and trace the side seam (Fig.51c). 11. Complete the pattern by adding all the necessary pattern symbols and notations. Should you wish three French darts instead of two, slash all three French dart lines. Place sections 2a and 2b in the dart opening so that all spaces between are equal (Fig. 51d). Proceed as for two darts (Fig. 51e). An interesting design for a dress results from utilizing related dart control in bodice and skirt (Fig. 52). The French darts of the bodice are placed at the waistline and developed as in Fig. 51. The skirt pattern is developed as directed below.
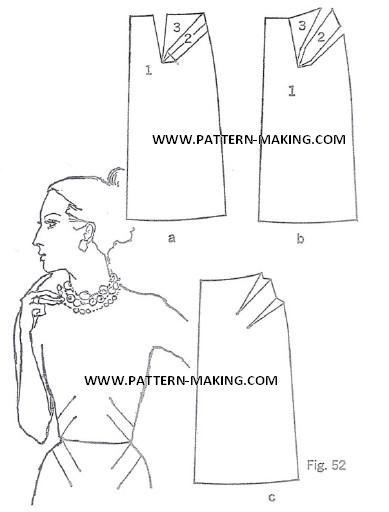 How to make Multiple Darts in the skirts 1. Trace the skirt-front sloper. Cut out the tracing and the dart. 2. Draw a guideline for the position _of the darts. Draw new dart lines 1/2 inch away on each side of the guideline. End the lines 1/2 inch from the dart point to shorten the new darts while in construction. Connect the ends of the new darts with the dart point (Fig. 52a). (Should the skirt dart not be long enough to provide the desired angle for the new darts, extend it .) 3. Label sections as illustrated (Fig. 52a). 4. Cut away section 2 from the rest of the skirt. 5. Close the original dart and fasten with Scotch tape. 6. Place section 2 in the new dart opening so the spaces between 1 and 2 and 3 and 2 are equal (Fig. 52b). Trace the pattern. 7. Locate the new dart points in the center of each space. Draw new darts from the new dart points. Fold the darts into’ position and trace the side seam (Fig. 52c). 8. Complete the pattern with all the necessary signs and symbols. {Credit} Design Your Own Dress Patterns Adele P. Margolis


Comments are closed.