
Drafting the Push up Sleeve
2 STYLES-STYLE 3
Sketch shows 3/4 length sleeve with cuff pushed up toward the elbow. Sleeve has allowance for gathers to make it puff around the arm. In addition, the sleeve has an extra allowance for an inverted pleat in the back, to give it greater fullness at that point. 1) Draft sleeve 3-1/2″ shorter; then make cuff 4″ deep as indicated. Slash from cuff to elbow dart; then close up cart as shown in diagram 2.
2) Straighten the back seam line; then separate cuff and add 1″ hem as shown in diagram 3. 3 & 4)
Divide sleeve into 8 equally spaced parts and mark sections A to H.
Make slashes from bottom to cap of sleeve and spread as indicated; then draw bottom line of sleeve as shown by dotted line, making sleeve about 1/2″ shorter between sections B and C, and about 1/2″ longer between sections F and G. Allow seams in sleeve and cuff; then cut out in fabric.
5 and 6) Make the inverted pleat before gathering lower edge; then join to upper edge or cuff. Join underarm seam of sleeve and cuff, and press seam open. Hem bottom of cuff.
6) Showing sleeve, right side out.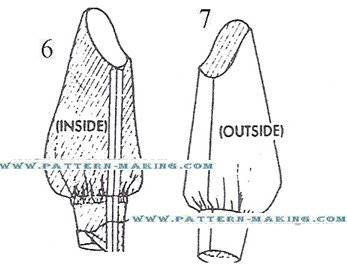 Style 4 This sleeve [about 3/4 length] is similar to style 3 sleeves, but instead of a cuff at lower edge, sleeve is finished with a casing and elastic to hold sleeve in position, just below the elbow
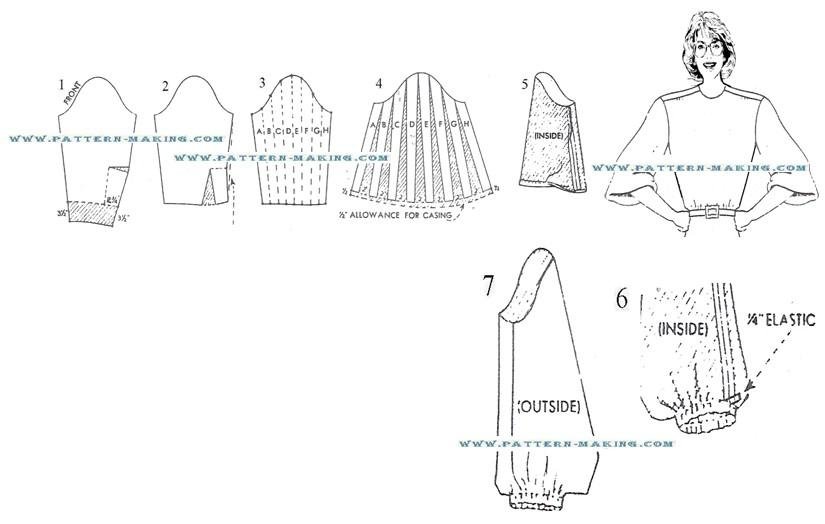 1) Draft sleeve 3-1/2″ shorter; then slash from bottom to elbow dart and close up dart as shown in diagram 2.
2) Straighten the back seam line as indicated.
3 & 4) Divide sleeve into 8 actually spaced parts, and mark sections A to H. Make slashes from lower edge to cap of sleeve and spread 2″ at each slash. Add 1/2″ for casing at lower edge. Allow seams to complete the pattern.
5 & 6) To make sleeve in fabric, first join underarm seam, and press seam open; then make casing at lower edge, leaving a small opening at underarm seam to insert elastic. Insert elastic [about 1/4″ wide] and fasten ends together.
7) Showing finished sleeve, right side out.


Comments are closed.