
Drafting The Push up Sleeve
Draft The Push up Sleeve STYLE

Sleeve is in two sections, and is called the ‘Jack-O-Lantern’ sleeve. The pattern is so cut that the upper and lower sleeve sections are circular, thus eliminating the underarm seam.
1) Trace the one-piece shaped sleeve foundation; then draw the outlines of the short sleeve, making the underarm about 6” long, and 1” narrower each side of the underarm at lower edge. Draw lower line slightly curved. First divide sleeve into two parts, making upper sections about 2-1/2” long at sides. And about 5” deep at center; then divide sleeve into 8 equally spaced parts
2) Separate lower sleeve from upper. Then slash along dotted lines and spread to from two circular sections, slashing from lower edge to top in the upper sleeve, and from upper edge to bottom in sleeve.
Arrange the spread parts carefully to form the inner circles as illustrated. Make the outer circle of upper and lower sleeve sections alike in shape and size.
3) Add seams and mark corresponding notches.
_______________________________________________________________
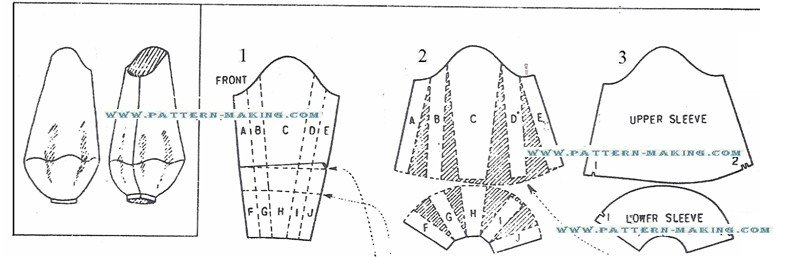
Illustration shows sleeve with greater part of fullness about 6” wrist. It is a 2 section sleeve with a narrow band at the wrist.
1) First take out dart by making a tuck in back of the sleeve foundation pattern to nothing in the front at elbow, as illustrated; then trace the sleeve.
Divide sleeve into 10 parts, making the lower sleeve about 6” long, and sections A, B, C, D, E, F, G, H and I about 1-1/2” wide,.
2) Slash upper sleeve along the dotted line from lower edge to cap, and spread apart about 3” between sections C, D and E, giving a little more fullness in back.
Make slashes in lower sleeve from top to lower, and spread sections the same amount as the upper section at corresponding positions.
Add about 1” to the length of the upper sleeve between sections B and E, as shown by dotted line. 3) Add seams and make corresponding notches.


Comments are closed.