
Sleeve Drafting
3 STYLES

Illustration shows sleeve with great amount of fullness at top, but fitted from elbow to wrist.
1) Use the 1-piece shaped sleeve pattern as a guide, and mark a line down 4” long from the shoulder notch.
2) Mark position for slash lines, 4” apart on either side of the sleeve; then draw the lines and mark sections A to E.
3) Slash along dotted lines and spread as illustrated, making the spread at top about 4”.
4) Shaded part of sleeve is about 4” deep and is to be stiffened with interlining.
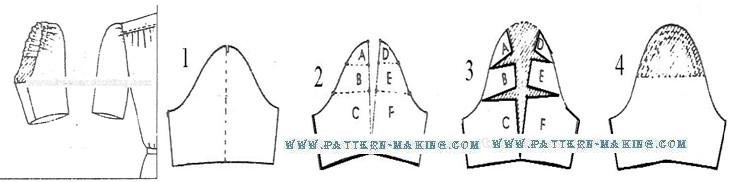
Sketch shows sleeve gathered at top but is fitted closer at the bicep than style 1 sleeve.
1) Trace short sleeve and draw line through center.
2) Divide sleeve cap into 6 equal parts; then draw 2 lines straight across. Mark sections A to F.
3) Slash through center from top to bottom; then across along dotted lines and spread as illustrated, making the spread at top about 4” 4) Make sleeve stiffening for top of sleeve 4” deep.Sleeve has 5 pleats at top, all pressed toward the back.
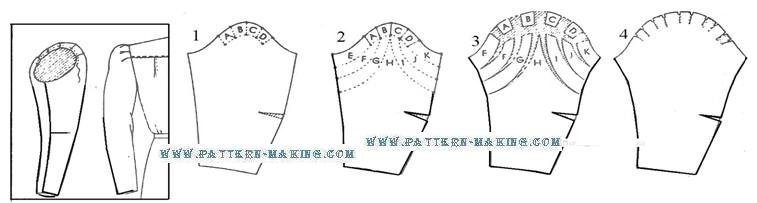
1) Trace the 1-piece shaped sleeve and mark the positions for pleats 2” apart at top, 2” long, and 1-1/2” apart at bottom. Mark sections A to D.
2) Mark positions for the slash lines, 2” apart on either side of the sleeve; then draw slightly curved lines. Mark sections E to K.
3) Slash along dotted lines and spread as illustrated, making the spread for each pleat 1-1/2” wide. 4) Trace sleeve and mark the pleat lines as illustrated.


Comments are closed.