How to make the pattern for a control seam
How to make the pattern for a control seam with divided control shoulder to waistline
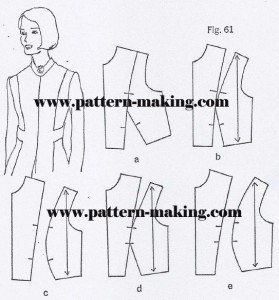
 1. On the cut-out bodice-front sloper with the cut-out dart, draw the style line from the shoulder to the dart point. Indicate the notches by cross lines on the style line-3 inches above and 3 inches below
the dart point (opposite each other on the dart legs, Fig. 61 a) .
2. Slash the style line and divide the dart control. Fasten with Scotch tape. Establish the grain line in the side-front section parallel to the center front (Fig. 61b) .
Since the two sections of the bodice pattern are to be separated and cut individually in fabric, you must know how to place the side sections on the grain of the fabric and at what points to match the sections.
The notches are best marked before the control is divided.
most important. It is the grain line that is the clue to how much control is in each dart. If you change the position of the grain line,you change the amount of the control.
3. For a fitted garment, separate the two sections. Correct the angularity of the side-front seam line (Fig. 61c).
For an easier fit, shorten the darts and connect the new dart points (Fig. 61d).
Place cross lines for notches at the points of the darts instead of as in Step 1. Separate the two sections of the bodice.
Correct the angularity of the side-front seam line (Fig. 61e).
4. Complete the pattern.
{Credit} Design Your Own Dress Patterns
Adele P. Margolis


Comments are closed.