The Grain Line (Straight of Goods)

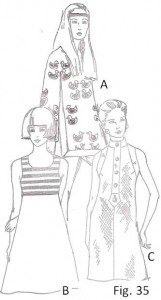
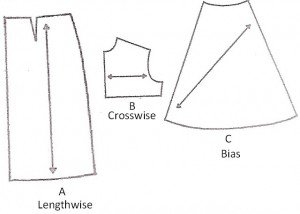
The designer uses the “hang” of the fabric as part of the design. Because fabric is woven as it is, it hangs best with the lengthwise grain and most fabrics are used in this way (Fig. 35a). Sometimes for a special, decorative effect a garment is cut in whole or in part (Fig. 35b) on the horizontal grain. Both for decorative reasons or for a special kind of fit, fabric is used on the bias. Bias, being stretchable, produces a molded, clinging, form-defining fit (Fig. 35c). It is almost always used for draped effects. In most patterns, the grain is indicated by a long line with an arrow at each end (Figs. 34a and 34c). Sometimes the grain is indicated along one edge of the pattern with the printed or lettered direction, “Place this edge on the straight of goods.”
A decorative selvage is often utilized in this way (Fig. 34b). Whatever the grain, the grain line should extend throughout the entire length of the pattern to assure accurate placement of: pattern on fabric. Theoretically, placing the pattern on the fabric so that the grain line is an equal distance from the selvage at both ends should guarantee that fabric will be cut on the straight of goods. It is on this principle that most commercial patterns provide a short grain line. Unfortunately, this cannot be true unless the material is anchored so firmly in correct position that it cannot slide off grain. Otherwise what may be accurate at the two points measured may be completely wrong in other places., Don’t take chances. It is easy enough to draw a long grain line.
HOW TO ESTABLISH THE LENGTHWISE GRAIN From the center front or center back of the pattern, measure over equal distances in two or more places. Draw a line connecting these points and extending the entire length of the pattern. This places the grain parallel to the center line.
HOW TO ESTABLISH THE CROSSWISE GRAIN At the widest part of the pattern, place the right angle (90 degrees) of your triangle against the center-front or center-back line with one leg of the triangle directly over it. “Square” a line across the entire width of the pattern (Fig. 36d). This is the crosswise grain. A right angle or “square” may also be established by using the “tailor’s square” (Fig. 36e) or a “T-square” (Fig. 36f) in the same way as the triangle. HOW TO ESTABLISH THE BIAS GRAIN With the triangle in the same position as for the horizontal grain (Fig. 36d) draw the diagonal line opposite the 90-degree angle or square. {Credit} Book: Design your own Dress Patterns Adele P. Margolis


Comments are closed.