How to make multiple dart tucks at the neckline
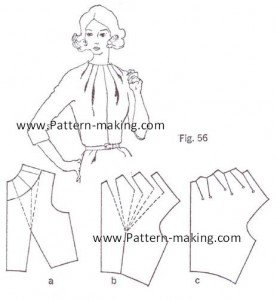
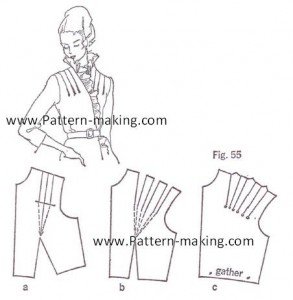
 1. Trace the bodice-front sloper. Cut out the tracing and the dart. 2. Lightly draw an arc as a guideline for positioning the dart tucks (Fig. 56a). Make it a distance from the neckline equal to the length you desire for the dart tucks. They may be of equal length or graduated. 3. Draw the lines for the dart tucks showing the number and the position of each one. Designate the point at which the stitching is to end (Fig. 56a). 4. Connect the ends of the dart tucks with the original dart point (Fig. 56a). All lines from neck to dart point (crooked though they are) become slash lines. 5. Close the waistline dart in whole or in part (Fig. 55b), throwing the dart control to the shoulder. Fasten with Scotch tape. 6. Arrange the sections so the spaces between are equal (Fig.55b). 7. Trace the pattern. When you come to the dart tucks, trace only to the end of each tuck as designated in Step 2 (Fig. 55c). Notice that the dart tuck legs are not parallel lines. Being parts of darts, they are tapered. They must be stitched so.
  8. Fold the tucks into position (the same rule as for darts). Trace the shoulder seam (Fig. 55c). Working with stiff paper in a small pattern makes this somewhat difficult because the dart tucks are so tiny. Trace the construction pattern to either tissue paper or a paper napkin. You’ll find them much easier to manipulate for folds. 9. Complete the pattern. {Credit} Design Your Own Dress Patterns Adele P. Margolis


Comments are closed.